 You can train a dog to sit. It isn’t very difficult. The trouble is, as soon as someone gives him a pat, or speaks to him, he’s all over the place. And if another dog is around, well you can probably forget it.
It needn’t be this way. This training series shows you how you can train a dog to sit still in a whole range of different everyday situations. It is not a quick fix, but follow this step-by-step system carefully and you will have a sit that will make you proud of your dog. This method is suitable for all breeds of dog and does not require the use of punishment.
Many people teach their dog to sit at home, where there are few distractions, and are then disappointed when the dog is disobedient whilst they are ‘out and about’. This happens because a dog’s brain is wired up differently from ours. Fortunately we can design a training plan that overcomes this problem and soon have a dog that will sit still when he is told in most normal circumstances.
Contents
- 1 How old does my dog need to be?
- 2 How long will it take?
- 3 Part 2 – Into Position
- 4 Part 3 – Building the ‘Stay’
- 5 Part 4 – First Distractions
- 6 Part 5 – Introducing Distance
- 7 Part 6 – Training your dog to sit
- 7.1 The ideal Assistant
- 7.2 Make it easy for your dog to learn
- 7.3 Exercise 1 – Increase sit to 30 seconds
- 7.4 Exercise 2 – Sit whilst a person enters the room
- 7.5 Exercise 3 – Separating dog and handler
- 7.6 Exercise 4 – Sit outside for one minute
- 7.7 Exercise 5 – Sitting outside whilst people approach
- 7.8 Exercise 6 – A new helper
- 7.9 Exercise 7 – helpers become more interesting
How old does my dog need to be?
Any dog over nine months old can reasonably be expected to sit still for two minutes. However, the point at which dogs reach the maturity to sit patiently varies from breed to breed and from individual to individual. Some very lively dogs may take longer to learn this skill than more placid dogs that are much younger.
We will break the training down into little chunks, work through each chunk one step at a time, and at each stage give you a minimum age your dog should be before moving on to the next step. These ages are guideline only. If your dog is having fun you can bend the rules a little.
Over the next few days I will show you how to build up duration, distractions, and distance gradually and carefully so that your dog achieves success at every stage of the way. The secret is to stay at each step until the dog can do it easily, then move on to the next one.
How long will it take?
You will need to spend a few minutes each day training this skill. Twice a day, morning and evening, is ideal. How many days this will take you depends on how old your dog is when you begin training, and on his temperament.
If your dog is inclined to be a little excitable, or you start a lot younger, it will take you a lot longer than if you start with a fairly calm six month old puppy.
But don’t worry because it is all a lot of fun, and neither you, nor you dog will be getting bored.
Part 2 – Into Position
In part one of this article we explained that we are going to begin teaching the two minute sit by ‘catching the dog in the act’ and rewarding him for being in that position. But before we can reward the dog for being in the right position, we have to get him there! There are several ways of getting the dog into the sit position and each has its own pros and cons
Methods we can use to get a dog into the ‘sit’ position are:
- Capturing
- Luring
- Manipulating
- Shaping
Let’s have a look at each in turn
Capturing
This is very straightforward. You just wait for the dog to sit of his own accord!
Pros and cons?
Some dogs don’t sit for ages, you could get quite bored. Others sit all the time. Capturing is a good choice for this kind of dog.
Luring
A popular method for getting a dog into a position. Luring involves showing the dog something attractive to him (food or a toy for example) and using it to encourage the dog to change his position.
We can start doing this quite simply with a puppy’s food bowl. If you hold it just above his head whilst he is standing still and move the bowl slowly towards the direction of his tail, the chances are he will drop into the sit position as the bowl passes over his head.
Pros and cons?
This is a nice simple method, and can be used at other times by replacing the meal with a tasty treat. However, some dog just start yapping or jumping up and down if you delay their meal by so much as a nanosecond. Not such a good idea for them, as noise problems can be very difficult to cure.
Manipulating
This is the old school trainer’s technique. He attaches the pup to a lead, and holds on to the lead whilst pressing down on the puppy’s rear end, and saying ‘Sit’ very firmly. Once the dog has put his bottom on the ground he is then stroked and praised.
Some dogs are ok with this, and learn quite quickly to put their bottom on the ground as soon as they hear the word sit. With this method, once the trainer has achieved a few successful sits from the dog, he will often begin correcting the dog if it fails to sit.
Some dogs will initially resist pressure on their bottoms quite strongly. Some will squirm and try to evade you, some may even get quite stressed. The method falls down because it can cause confusion in the dog (he is being asked to respond to a word he does not yet understand) and because it may fail to reward the dog effectively. It can be a very quick method with an older dog, but it is not a great approach to use with a young puppy.
Shaping
This means rewarding the dog for a series of incremental approximations towards your eventual goal. In plain terms you start by rewarding a small change in behavior, then gradually keep moving the goal posts for your rewards until you have the behavior you want.
For example: a dog cannot sit whilst it is running about, so to shape a sit we might begin simply by rewarding the dog for standing still. Once he will stand still for the reward, we then become more selective and only reward where he shows signs of lowering his rear end, even if it doesn’t touch the ground. Eventually we only reward for a full sit.
Shaping is a great method for complex positions or sequences of actions. We don’t always need to use shaping with the sit. Because a sit is such a natural and popular position with many dogs we can often simply ‘capture’ it straight away. However, shaping is useful to get a lively dog to keep still and pay some attention to you, so that you then have a better opportunity to lure or capture the sit.
Which way should you use
I suggest that you use a combination of ‘capturing’ and ‘luring’. Set aside five minutes or so, once or twice a day in an enclosed space with your dog and some food treats.
Make sure there are no distractions, just you and the dog. Really focus on the dog for the whole five minutes. With these methods you can start with a small puppy just as soon as he has settled into his new home.
Be ready to ‘mark’ any sits he offers and follow up your marker with a nice reward. At meal times, you can use your puppy’s food bowl as a lure and remember to give him your marker the instant his bottom hits the floor
Marking the sit
We looked at why you should use a marker in the previous article in this series ‘into position’. You can use a word, or a click from a clicker ( how to charge a clicker) as your marker. To mark the sit, watch the dog closely and make the marker sound as soon as his bottom touches the ground. It is better to mark a fraction too early than too late.
It is fine if the dog gets up again. In fact you want him too. We are looking for lots of practice at sitting now, not for one long sit. Just give the dog his reward as soon as you have ‘marked’ the sit.
Some dogs just stay sitting after your ‘marker’ – they reckon this sit position means food and they are not going to move! The answer to this is to throw the treat away from the dog so that he has to get up to eat it. You can say a ‘release’ word (eg ‘off you go’ ) as you do this. This will be useful later on. Once the dog is up on his feet again, he can then offer you another sit, and another opportunity to reward him for it.
Asking for a sit
When the dog has heard you say ‘sit’ as he sits for two or three sessions, try saying sit before he decides to sit. If he does not sit within a few seconds of you giving the sit word, don’t worry. Just turn away and take your attention off the dog for a moment, then turn back and spend a little more time on word association (saying sit as he sits).
Try using your sit word as a ‘cue’ for him to sit again in your next session. Ignore him if he fails to respond to your cue, mark and reward all sits. Your dog will soon be sitting every time you say sit. Make sure you mark the sit for him immediately and then throw him his treat.
To sum up:
- Set aside a couple of five minute sessions each day to capture or lure lots of sits
- Make sure you are on your own with the dog
- Mark and reward each sit
- After a few sessions start naming the sits
- After a few more sessions start asking for sits
- You have now established the beginnings of a ‘sit’ command, and this is a foundation on which we can build. However, your new command is very fragile and very specific to the learning environment you have created for your dog.
Don’t be tempted to ‘test’ your dog in more difficult circumstances yet, he will fail, and you will have set him up to do so. We will introduce distractions including other people as you progress.
Part 3 – Building the ‘Stay’
The word sit will soon come to mean “put your bottom on the ground and keep it there until I say you can move”. When we teach a dog to lie down, the same applies. You do not need the word stay. Down means “lie down until I say you can move”
This keeps things simple for the dog.
Increasing duration
Until now you have been marking the sit as soon as the dog’s bottom hits the ground. If you are not sure what ‘marking the sit’ means, have a look at Part One of this series. It is called ‘what you need to know’. In part two you practiced getting the dog into the sit position with lots of brief sits. Now we are going to ask the dog for some slightly longer sits in order to earn his reward.
You will need to start counting in your head as soon as your dog’s rear end makes contact with the ground, and you will stop counting when his rear end lifts up again. Count out seconds (one thousand, two thousand etc). To begin with all you want to achieve is a two second sit.
The two second sit
This is actually quite an important step for the dog. And it may take him a few sessions to get the hang of it. What you will do is to start ignoring the very briefest of sits. You will not mark or reward these sits. Just ignore them completely and wait for the next one.
This will surprise your dog. He will be expecting a reward after every single sit because that has been the deal so far. He will regard you with interest, and quickly offer you another sit.
Don’t let too many sits go past (no more than two or three) without a reward at this early stage, or his enthusiasm for sitting will shrivel and die!
Be patient, sooner or later you will get some slightly longer sits. Be ready, mark them, and reward. Once you have a couple or three of these you will be making real progress. Work on reaching the point where nine out of ten sits are the full two seconds. Ignore the occasional short sit if it occurs.
Now it is time to start increasing the duration of the sit once more.
The five second sit
Building up from two seconds to five is quite straightforward. Start with three seconds first. Count in your head as soon as the dog’s bottom hits the ground. This time you will count to three. If the dog gets up before three, ignore him for a couple of seconds them ask for another sit. Just as before, if he doesn’t make it to three seconds very often at first, don’t ignore more than two or three shorter sits. Reward him anyway. You can try again tomorrow for three seconds. What you are doing is gradually moving the goalposts. Once you can get nine or ten three second sits in a row it is time to increase to four seconds, and then five. Take it slowly, especially with a small puppy. If you are getting a lot of refusals, or the dog is regularly getting up after a second or two, do something else for a while. Try again tomorrow, and make sure that the dog is hungry when you start your session.
You will get there. It may take only a couple or three sessions, it may take a week of daily sessions. Be patient.
Five seconds is long enough for small puppies to sit still. They have very short attention spans. I recommend you do not go beyond a five second sit, until your puppy is at least ten weeks old.
Introducing the lead
A lot of dogs wriggle and squirm when you put their lead on or take it off again. This is very annoying and bad manners. Introducing the lead at this stage enables you to teach the puppy to sit whilst you put on and take off his lead. It also introduces some structure and control into your training sessions.
Once you start teaching your dog to walk nicely on a lead you will need him to be able to sit and stay on the lead, so that you can stop and chat to people, or to wait before crossing the road. This is an important learning step in the overall scheme of things.
Feeding on the lead
Note that from now you will be feeding the dog from your hand, and not throwing the treat for him to rush after. He is on a lead so you will be able to get him moving again ready for another sit, by walking forward a few steps.
If the dog gets up in between your mark and giving him his reward, just lure him back into the sit using the treat. Don’t feed him whilst he is standing up.
First lead session
To begin with just pop a lead on your dog and wait for him to stand still (don’t give the sit command whilst he is leaping about). Give your sit command and mark and reward the sit almost immediately. Get him moving again and then stop and ask for a two second sit. Mark and reward. Ask for several more two and three second sits this session and leave it at that.
In your next on-lead sit session, you can increase the duration of the sits back up to five seconds. Mix very short sits in between the five second ones, and finish the session with a very short sit. This practice of ‘sandwiching’ more difficult tasks between easier ones, is a helpful strategy in all aspects of dog training.
A good habit to get into
When you have finished your training session, hold on to your dog’s collar as you unclip his lead. Wait for a couple of seconds then give your release command as you let go of his collar. Dogs are never too young to learn that they should not rush off without your permission.
No testing
Don’t be tempted to ‘test’ your dog in front of other people. Keep your training to the training sessions, or to times when you are able to concentrate on him and when he is free from distractions. Dogs cannot understand that new commands apply in lots of different situations. This is a more advanced concept that we will address later in the series. For now training should be
- In the same place
- With the same person
- Without distractions
Part 4 – First Distractions
In this article we will introduce the first simple distractions to your dog’s new sit. By the end of this training stage your dog will sit perfectly still whilst you take his lead on and off, and whilst you step all around him.
You are a distraction
The first distractions we introduce to the dog, are things that you, his handler, do. A newly trained sit is a fragile thing. Your dog is likely to get up if you step away from him, or move suddenly, or attempt to remove his lead. This is normal behaviour, and you need to train your dog not to do it.
The two exercises we will look at in this article, are
- Removing the dog’s lead
- Stepping around the dog.
By the end of this section you will be able to ‘sit’ your dog, take your dog’s lead on and off, and to step all around him in any direction, without him moving.
Exercise One: Removing the lead
Step one: Touching the lead
Ask your dog to sit. Reach out your left hand and touch the clip on your dog’s lead. If he remains sitting still mark and reward. Then walk him on a few paces and repeat several times, each time touching his lead more firmly as if you were about to take it off.
Step two: Unclip the lead
Ask your dog to sit. Unclip the lead and clip it back on again immediately. Mark and reward
Repeat several times.
Step three: Bring the lead away
Ask your dog to sit, unclip the lead and move the lead up and away from the dog. Just a couple of inches to begin with. Work up to a point where you can put the lead in your other hand, then into your pocket before bringing it out again and putting it back on the dog.
If at any point the dog gets up before you are ready do not mark and reward. Simply replace the lead, walk on a few steps, then repeat Step two several times. Build back up slowly to Step three. Take as many sessions as you need.
If your dog is wearing a slip lead rather than a fixed collar and lead, the stages are:
- Touch the lead
- Loosen the lead
- Lift the lead part way over his head and back on again
- Lift the lead all the way over his head and immediately replace it
You must loosen a slip lead widely before doing this, if it scrapes over his face he is highly like to start wriggling.
Adding duration
Before we start exercise two you will need to add little more duration to the sit. Take it up to ten seconds. Teach your dog to do this in stages in exactly the same way that you increased duration from 2 seconds to 5 in Teach your dog to sit Part 3.
The dog is now on a lead and therefore you can control when and how far he moves in between sits. If you have taught him to walk nicely at heel on a lead you can practice short bursts of heelwork in between sits.
If you are working with a young pup just let him move about and pet him for a moment or two in between asking for more sits.
Exercise two: Walking around the dog
This second part is asking too much of a small pup. Wait until he is 12 weeks or so before starting this. Until that point practice Exercise one daily.
Step One: Point and touch
As always you should be alone with your dog. So the fact that you look like some kind of failed ballerina doing this exercise shouldn’t bother you!
Start this exercise with your dog sat on your left side. Remove his lead and stretch your right leg out to tap the ground in front of you with your toes. Keep your left leg still and your body weight remains on your left leg. It is a simple movement as though you were thinking about taking a step forward and changed your mind. Now bring your right leg back in again, and replace the lead.
If your dog did not move, mark and reward the sit. Walk on a few steps and repeat but this time touch the ground out to your right. You are still not taking a step. Your left leg remains firmly planted next to the dog. This reduces the chances that he will move.
If your dog gets up during this exercise do not mark or reward the sit. Just walk forward a few paces and ask him to sit again, whilst you stand quite still. Repeat a couple of simple sits without moving your leg so that you can reward him a couple of times
Then repeat the exercise with a much smaller movement of your right leg.
Keep trying until you find a movement small enough that it does not trigger your dog to get up. Mark and reward. This is your baseline, now gradually start introducing larger movements with your leg.
Once your pooch can sit quite still whilst you tap your foot to the front, to the side and to the back, it is time to take a step.
Step Two: Taking a step
Now you are going to ask your dog to sit, take one step forward with your right foot, bringing your body weight onto your right foot and bringing your left foot forward to join it. Then you will immediately step back into your starting position. Your dog should remain seated throughout. Mark and reward his good behaviour.
What if he moves?
Some dogs will get up when they see your left leg move. If so, go back to step one for a few minutes then try step two again but this time just lift your left leg off the ground rather than bringing it all the way forward to meet your right leg
This is not as complicated as it sounds
What we are doing is making it very easy for the dog to succeed and very hard for him to fail.
Because I have gone into a lot of detail, this may look like more of a big deal than it actually is, but in actual fact many dogs fly through this in no time at all. I am putting the detail in for the benefit of the few who will have a problem.
Now that you understand how to break the exercises down into steps I will simply outline the objectives of the next few steps which are as follows (each one starting with the dog at your left side)
- To take two steps forward and back again
- To take two steps back and forwards again
- To take two steps out to the right and left again
- To take one step forward then swing round to face the dog
- To take one step back then one step left across the dog’s tail behind him
- To take one step forwards, swing round to face the dog, then swing round again so that you are standing on his left (with the dog on your right)
- To step all around the dog in a complete circle in either direction
Complete each step successfully several times before moving on to the next one. Remember to remove the lead at the beginning of each step and replace it at the end.
If at any time the dog gets up before you are ready, do not mark and reward. Immediately give him some easier sits to achieve success, and then build slowly back up again.
Finish each training session with some really easy sits, and keep sessions short. Five to ten minutes is fine, but you can do this several times a day if you want to.
Exercise two is successfully completed when you can sit the dog, remove his lead, step all around him in either direction and replace his lead again. Make sure you can do this several times in a row, walk the dog on a few paces in between each repetition.
And be careful not to tread on his tail!
Part 5 – Introducing Distance
Being able to leave your dog sitting whilst you walk away is a useful skill. This is not an exercise for tiny puppies that are still dependent on your close presence to feel secure. But you can start this training with any dog from about four months old provided that he has completed the previous exercises in this article.
Training outdoors
Unless you live in a mansion, the exercises in this article are probably going to have to take place outdoors in your garden. Public parks are not suitable yet, because there are too many other potential distractions (other people, dogs, squirrels, etc.) Training in a different location is in itself a distraction for the dog. So before you start the exercises below, you should spend a little time there, practicing the simple exercises that the dog knows already.
Start from the beginning with some very short sits with your dog on the lead. Gradually reintroduce the removal of the lead, and the ‘stepping around the dog’ exercises that you have been doing indoors.
Before you start moving away from the dog, you will also need to add just a little more duration to the sit you have trained so far.
Exercise One: Increase duration
In the previous article in this article you taught your dog to sit still for ten seconds. Now you are going to increase this time a little to prepare the dog for the time it will take you to walk away from him and back again.
All you need to do is teach your dog to sit still at your side for 20 seconds. Use exactly the same steps as you did in part 3. Remember to make ‘sandwiches‘ – put the longer sits in between shorter sits – this helps to ‘set the dog up’ to succeed. Here is part 3: building the stay if you need to recap on increasing duration.
Leaving your dog
Once your dog can reliably sit still for 20 seconds it is time to begin teaching him to cope with being left alone. We will take this in little bite sized chunks so that your dog feels confident and secure. To build this confidence you need to follow a golden rule.
Always return to your dog
This makes the dog feel safe. His security is based on the understanding that you will come back. He is not on edge waiting for you to whistle or call him. He can relax in the knowledge that all he has to do is sit still and wait, and you will return to him.
Remember to ‘mark’ and ‘reward’ successful sits. You may find it helpful to read up on the use of reward markers.
Exercise Two: Walking the T
In this exercise you will get your dog accustomed to you moving ten yards away from him and walking about a bit.
Step 1 – Backing away
Sit the dog and stand in front of him so that you are facing each other. Remove the dog’s lead. Back a couple of steps away from the dog and immediately return to him and replace the lead. Mark and reward the sit.
Step 2 – Increasing the distance you back away
Gradually increase the distance that you travel backwards from the dog up to about 5 yards. Each time return to the dog, replace his lead, and mark/reward the sit.
Step 3 – Walking away
In this step you are going to get the dog used to seeing you disappear from behind. Start the exercise with him in the heel position. Sit your dog at your left side, remove his lead and walk two steps forward, now retrace your steps backwards to rejoin the dog, replace his lead, and mark/reward the sit. This is different for the dog because he cannot see your face.
Step 4 – Increasing the distance you walk away
Repeat step 3 gradually increasing the distance you walk from the dog. Once you get to 3 or 4 yards start swinging round so that you return to the dog facing him, rather than walking backwards. Provided the dog is happy and confident, you can increase the distance. Out to 5 yards or so for a pup 5 months or a bit younger, 10 yards for an older dog.
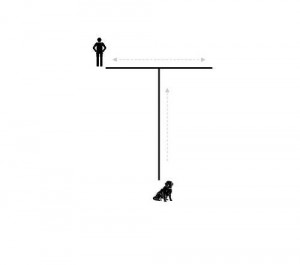
Step 5 – Walking the T
For this next step you are going to imagine a rather big T on the ground. Start with a small T, no more than 2 or 3 yards in height.
Sit the pooch at the foot T and then walk to the cross bar. When you reach the top of the T, step sideways instead of returning to the dog and step sideways to your right and then back to the center, then do this again but side stepping to the left.
Now you should return to your pooch.
Step 6 – Making the T bigger
In this step you should repeat step 5 and make the T gradually larger as you proceed. Purposefully start walking up and down the bar as opposed to side to side stepping.
The T should be about vertically 10-yards to start out with but make sure your session ends on a smaller T.
Always remember to mark and reward each successful sit. If the dog gets up at any point, go back to an easier stage and work forwards more slowly.
Step 7 – Make yourself more exciting
In this step you will gradually introduce some extra activities that your dog will find interesting. Bending down and touching the ground at either end of the T- bar is the next step. Afterwards do a little jump and/or clap your hands.
This kind of activity is more tempting to the dog, especially you bending down or sitting on the ground, the closer you are to him. So now we will carry out these activities starting with your largest T, and then bring them gradually closer to the dog.
Watch your pooch and if you notice any temptation to find you, and see what you are doing then notch it down a little. You want to get your pooch into the mindset of winning, every time!
If your dog seems a little unsure you can simply revert to an easier stage and get in some more practice.
Exercise Three: Walking the clock
This exercise will help you to get your dog used to sitting still while you walk around him in a circle at around a distance of 10 yards.
Sound easy? That is because it is. There are just four steps. Remove your dog’s lead at the beginning of each step and replace it at the end. You can start this exercise when your dog is proficient at the previous one.
Step 1
Imagine your pooch is sat in the center of a clock. There should be only about 2 yards distance from the center, to 6-oclock position beginning with only 2 yards.
Next, sit your pooch in the center of the clock and then walk to 6-oclock.
Turn right and proceed to walk around the clock to the 3-oclock position. Next about-turn and return to 6-oclock.
Return to your pooch, put his leash on, mark and then give him a treat.
Repeat these instructions but in the other direction.
Step 2
First off, increase the distance whilst walking around the clock moving from the left and then to the right as you go. Walk as far as the 2-oclock and the 10-oclock position, then move to the 1-oclock and 11-oclock. Your pooch might start to swivel their head as you move behind him but he is just seeing where you are and hopefully will not move.
Step 3
Walk around the whole of the clock in a single direction, then alternate.
Step 4
Now the clock is getting gradually bigger – You can increase the radius from the click center to its edge one stride (or yard) at a time.make sure your dog is successful a few times at all distances before moving on.
Keep to a circle of five yards radius in all for four month old puppies. For 5 – 6 month old pups, 10 yards is ideal, and if you have a large enough back yard, and your pooch is 7 months or more you move take the circle out to 20 yards from your dog.
Diminishing Rewards
So far we have been making the dog work a bit harder each time for his reward. Now it is time to consolidate what he has learned and to introduce intermittent rewards. This is very important and you can read up more fully on this topic in ‘The Gambling Effect’ In brief, random and intermittent rewards generate deepen and strengthen a dog’s behavior. If you are not familiar with this concept you may find it helpful to visit the link before continuing.
From now on, each day that you practice walking the clock, you should begin to occasionally ‘omit’ the mark and reward that your dog has come to expect. Keep rewarding seven or eight out of every ten sits, but avoid any kind of predictable pattern. The dog must not know when he is going to get a reward, and when he is not.
After a few days of rewarding 7 or 8 out of 10 sits, drop the reward ratio still further to about half of all sits. Remember to reward randomly.
Making ‘stay’ practice interesting
Mix in different types of stay in your training sessions. Sometimes you can walk the T, other times the ‘clock’. Yet other times just walk away from the dog and straight back again. You can increase your distances on this one a little as you become more confident in your dog’s ability.
Sometime you can walk around the dog, other times you can run. Sometimes you can sit down or lie down on the ground, or sit on a chair, other times remain standing.
The dog is learning that sit means sit, no matter what you get up to. Now it is time to teach him that he must remain seated no matter what ‘other people’ get up to. More of that in the next section!
Part 6 – Training your dog to sit
We are getting to the interesting part now of ‘sit’ training now. In ‘train your dog to sit part six’ we introduce other people into your training sessions. The owners of friendly dogs often find that their ‘sit’ command goes to pieces when other people are around. All it takes is a passing stranger saying hello to your dog, or a small child wandering past with an ice-cream and your dog is off!
Well it needn’t be this way.
In this part we will begin to teach your dog to sit still even when people walk up and stroke him, talk to him, or wave food about in front of him. And you will need some help. Initially, you will need to be careful about choosing your helpers. Children under 11 are rarely good at this.
The ideal Assistant
You need someone that will follow your every word – You are not going to put your pooch through any difficult or challenging sits, and your helper must not give your pooch any feedback at all. Any badly timed reward or kindness might be divert your dogs attention and mess up the training process.
Make it easy for your dog to learn
There are various factors which increase the difficulty of the sit for your dog. These ‘variables’ range from ‘duration’ of the sit, through the ‘distance’ between the dog and his handler, to the ‘type’ of distraction (eg children, dogs, etc) to the proximity of the distraction from the dog. And include a whole range of environmental factors once you begin training outdoors.
Here is a rule: When you make one variable harder, make the other variables easier to begin with.
You can read more about balancing variables in ‘making it easy for your dog to learn’, but in brief, when you introduce new distractions to the dog, you will shorten the distance between you and the dogs, and make sure that in all respects, that the sit is just as easy.
Once the pooch has mastered new distractions close up, you can increase distance and duration. In this case we’ll take the session back to inside the house to where you the training first started, then we will introduce these distractions only one at a time.
- Owner comes into the room
- Owner does a circuit around the dog
- Owner gives the dog a stroke
- Owner gives the dog some food or a treat
Exercise 1 – Increase sit to 30 seconds
You know how to do this now. Teach your dog to sit at your side for 30 seconds. In just the same way as you taught him to sit for 20 seconds in Part 5.
Exercise 2 – Sit whilst a person enters the room
You will need to have a prearranged signal with the helper. Make sure your helper knows not to come in until say “come in”, or “enter”.
Step One: head around the door
When you say ‘enter’, all your helper will do is open the door enough to pop his face around, then close it again (after removing his head of course!)
Sit the dog next to you with his lead on in the center of the room. Say ‘enter’.
Once your assistant has closed the door again, mark and reward the sit. If the dog gets up, he gets no reward. Repeat until he gets it right. When your dog is able to remain seated throughout, you can remove the lead before you say ‘enter’ and replace it again once the assistant has disappeared and before you mark and reward the sit.
Repeat several times, especially if the dog seemed excited or keen to get up.
If the dog has problems with this, take the dog as far from the door as possible, keep his lead on throughout, and ask your helper to repeat the exercise but just to open the door a crack this time, keeping his head behind the door. Say ‘enter’ and remind the dog firmly to ‘sit’ as your helper opens the door. Mark and reward all good sits, make the exercise as easy as necessary in order to succeed and then build back up until the dog can sit still whilst your helper puts their head around the door.
Step Two: Entering the room briefly
In this step your helper will enter the room, pause briefly, and then withdraw. He will not approach the dog. The dog must remain seated throughout, and if you have any problems, you will need to break the exercise down into smaller steps
The following steps are all achieved in the same way. Break it down into as many small steps as necessary to enable the dog to succeed. Here are the remaining steps you need to work through
- Step Three: helper enters the room, approaches and circles the dog but does not touch him.
- Step Four: helper approaches the dog and strokes him gently once or twice.
- Step Five: helper approaches and give the dog a treat before withdrawing.
Ask your helper to keep each repetition brief. Remember that your pooch only knows how to sit down for 30 seconds. If the helper a long time, your pooch might simply get up because he does not realize sitting can last this long.
Exercise 3 – Separating dog and handler
It is one thing expecting a dog to sit still next to you whilst your neighbor coos all over him, but what if you want to walk away from him and have him still sit there. You can teach your dog to remain seated when other people approach, even when you are not next to him.
All you need to do is repeat exercise one, but insert this little extra step take one step back from your dog after removing his lead and before you say ‘enter’. Once you have this ‘off pat’, then it is time to increase that one step to two steps. And so on. Take it slowly, your dog is doing great!
Exercise 4 – Sit outside for one minute
This is a much longer sit for your dog to learn, and he is going to do it indoors to begin with, and then in your garden. It is just a simple sit at your side. Nothing fancy and no distractions. Practice until he can sit for one full minute next to you, anywhere in your house and garden.
Exercise 5 – Sitting outside whilst people approach
This does not mean you should go out into a public place, you need to remain in your garden and make sure that there are no distractions apart from those you are arranging with your helper.
In this step you will work through exercises two and three above but your starting position will be standing in your garden with the dog seated next to you. The helper can appear and disappear through a door into the house, or a garden gate if you have one. Practice until perfect.
Exercise 6 – A new helper
If you can rope in another helper at this point so much the better. Preferably not a member of your family. Simply repeat exercise five with your new helper.
Exercise 7 – helpers become more interesting
This exercise is all about replicating a more realistic situation for your dog. Try and think of some of the scenarios that you will come across when you start practicing the sit out and about in public. Sometimes, people will run past your dog. They will talk to you, shout, talk, wave, eat, or give them, and generally tempt your pooch to break his sit and go up to them.
Get your helpers to ‘act out’ these distractions gradually, and if the dog starts to struggle – back up a bit. Once he is competent, start to mark and reward some sits and not others. Gradually reduce the proportion of sits that you reward until it is about one in three. Be unpredictable. Read up on the gambling effect if you are not sure why this is important.
Practice as many of these scenarios as you can with your helpers. Get as many people as you can to run through this exercise in this controlled situation. Especially people that do not know the dog very well. What you are doing is starting the process of ‘proofing’ your dog’s sit.
Lack of proofing can very often be the thing that marks the difference between a disobedient dog and a trained one.
Most people do not bother to proof their dog’s training. All successful trainers proof their dog’s training thoroughly.
All this action and interaction is great preparation for the day when you and your dog are thrust into a situation that you have not set up, and cannot control. Taking this kind of training into more advanced and unpredictable situations is another challenge, and we will be looking at this in a future article. Meanwhile practice makes perfect!
